LAB 8 - STUNTS!
Introduction
The aim of this lab was to incorporate everything we have learned so far and implement it into an interesting stunt of our robot. For this lab, I chose to do a flip as my stunt.
Throughout this lab, I will be testing the robot at the start line of 1-2 meters away from the wall, after which it will move forward up until 1 feet distance (which will be marked with blue tape in videos). The car will then perform a flip, after which it will manage to drive back to the start line.
Implementation of Flip Stunt
In order to achieve the flip stunt, I experimented a lot with PID control for the detection of 1-feet distance to the wall before the flip. However, I realised that open-loop control enabled me simpler implementation and testing, and since open-loop is allowed for this lab, I opted for it instead for the purposes of simpler debugging. The robot was programmed to be able to start from a stationary position which is 1-2 meters away from the wall, and once it reaches 0.3 meters from the wall, it accelerates at the opposite direction - that is backwards - at full speed, which results in it performing a flip. Considering that the performed flip is a front flip, in order for the robot to be able to go back to its original position, it has to go backwards again as its current position is now the opposite from the position right before the flip. This backwards movement is now performed at somewhat a lower PWM value in order to accelerate back to its original start line.
case STUNT:

int counter = 0;

success = robot_cmd.get_next_value(t1);
    if (!success)
        return;

success = robot_cmd.get_next_value(t2);
    if (!success)
        return;

success = robot_cmd.get_next_value(t3);
    if (!success)
        return;

success = robot_cmd.get_next_value(pwm1);
    if (!success)
        return;

success = robot_cmd.get_next_value(pwm2);
    if (!success)
        return;

success = robot_cmd.get_next_value(pwm3);
    if (!success)
        return;

t0 = millis();
distanceSensor1.startRanging();

    while(((millis()-t0) < t1)){
        //move forwards
    time_data[i] = millis();
    pwm_data[i] = pwm1;
    analogWrite(PIN1, pwm1);
    analogWrite(PIN0, 0);
    analogWrite(PIN3, pwm1);
    analogWrite(PIN2, 0);
    tof_data[i] = distanceSensor1.getDistance();
    counter++;
    }

        //move backwards
    while((millis()-t0)<(t1 + t2)){
    time_data[i] = millis();
    pwm_data[i] = -pwm2;
    analogWrite(PIN1, 0);
    analogWrite(PIN0, pwm2);
    analogWrite(PIN3, 0);
    analogWrite(PIN2, pwm2);
    tof_data[i] = distanceSensor1.getDistance();
    counter++;
    }

        //backwards after flip
    while((millis()-t0)<(t1+t2+t3)){
    time_data[i] = millis();
    pwm_data[i] = -pwm3;
    analogWrite(PIN1, 0);
    analogWrite(PIN0, pwm3);
    analogWrite(PIN3, 0);
    analogWrite(PIN2, pwm3);
    tof_data[i] = distanceSensor1.getDistance();
    counter++;
    }

        //still collecting data after the robot is stopped
    while((millis()-t0)<(t1+t2+t3+t4)){
    time_data[i] = millis();
    pwm_data[i] = 0;
    //car is stopped
    analogWrite(PIN1, 0);
    analogWrite(PIN0, 0);
    analogWrite(PIN3, 0);
    analogWrite(PIN2, 0);
    tof_data[i] = distanceSensor1.getDistance();
    counter++;
    }

for(int i = 0; i < ARRAY_LENGTH; i++){
    tx_estring_value.clear();
    tx_estring_value.append(time_data[i]);
    tx_estring_value.append("|");
    tx_estring_value.append(tof_data[i]);
    tx_estring_value.append("|");
    tx_estring_value.append(pwm_data[i]);
    tx_characteristic_string.writeValue(tx_estring_value.c_str());
}
break;
The implementation of the code was relatively simple as it requires open-loop control with manual adjustments of individual times for forwards and backwards movement, as well as stopping the car. The PWM values while driving the car forwards and backwards for the first time were kept at the maximum of 255 to fully accelerate the car to its maximum for the momentum to build up and flip the car. The last PWM value was experimentally determined to be 80 for the car to return to its start line. Furthermore the implementation of the analogWrite() functons for each of the pins was very easy to implement, since it is something that I performed in Lab 4 as well.
On the Python side of things, I implemented the notification handler called stunt_data for collecting the data arrays for time data, PWM data, and ToF distance data collected and sent through Bluetooth. Afterwards, the only command I had to run for the flip stunt to activate is the command attached below. The send_command() function for the STUNT case allowed me to experiment with time and PWM values.
time_data = []
tof_data = []
pwm_data = []

def stunt_data(uuid, bytes):
    s = ble.bytearray_to_string(bytes)
    if("|" in s):
        notif= s.split("|")
        time_data.append(float(notif[0]))
        tof_data.append(float(notif[1]))
        pwm_data.append(float(notif[2]))

ble.start_notify(ble.uuid['RX_STRING'], stunt_data)
ble.send_command(CMD.STUNT,"800|800|1000|255|255|80") #[t1, t2, t3, pwm1, pwm2, pwm3]
Another major reason for the success of flipping the robot is weight balancing. Considering that the ToF sensor was oriented in the directon towards the wall, in order to perform a front flip, the car had to have larger weight at the front of the car. Therefore, in order to achieve this, the remaining 750 mAh battery was placed, as well as two smaller 50 g weights which I was able to borrow from Sabian Grier and attach to the front of the robot.
Flip Results
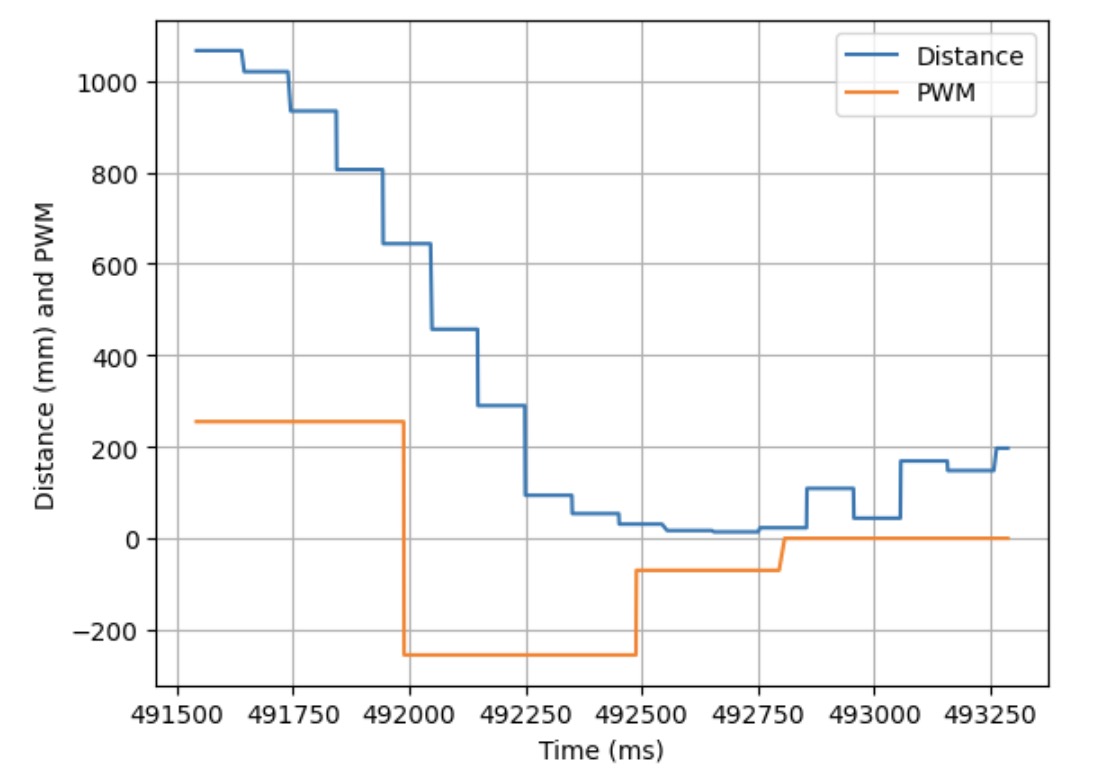
Below are the demonstrations of my flip stunt working, as well as the corresponding graphs for each of the runs indicating Distance over time, overlapped with PWM over time.
Stunt #1
duration = 2.4 seconds
duration = 2.4 seconds
The corresponding graph for the flip demonstration is the following:
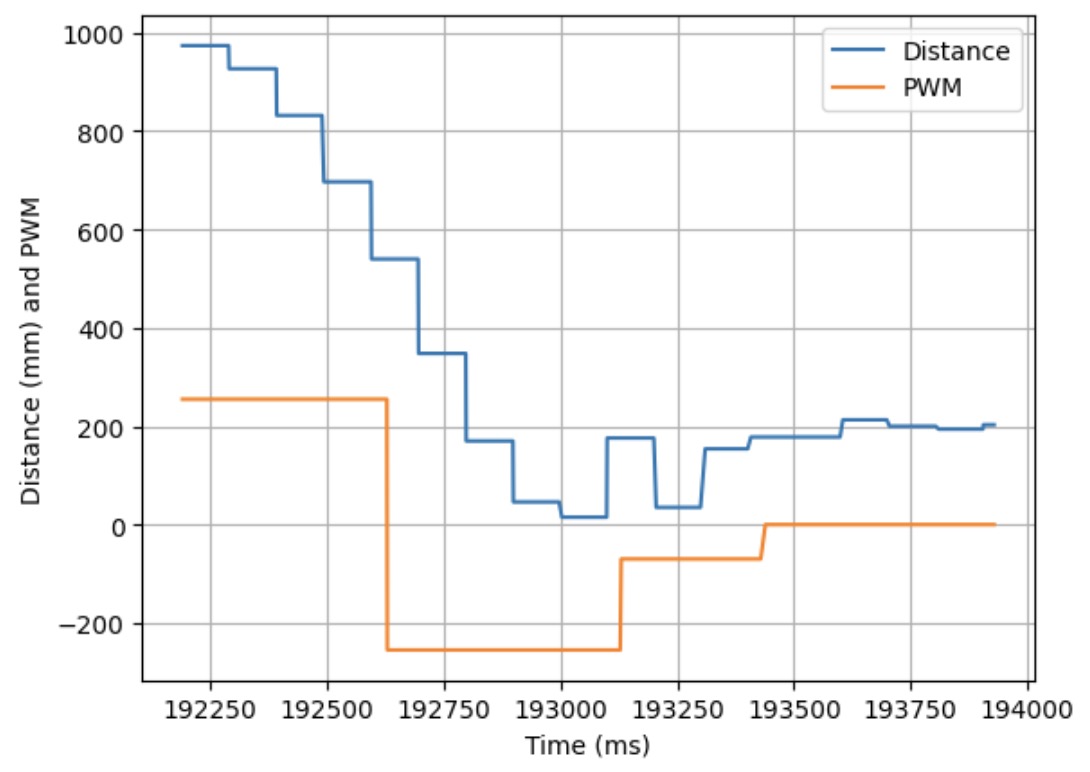
Stunt #2
duration = 2.2 seconds
The corresponding graph for the flip demonstration is the following:

Stunt #3
duration = 2.2 seconds
The corresponding graph for the flip demonstration is the following:
Additional stunt
duration = 2.3 seconds
BLOOPERS!
Discussion
This lab was very fun to implement, and I liked that it incorporated knowledge from different labs into a fun stunt.
Acknowledgements and References
*I worked with Becky Lee and Annabel Lian throughout this lab.